Linux
OpenSolaris 2008.11 Acer Aspire One Install
by admin on Mar.09, 2009, under IT Adventures, Netbooks
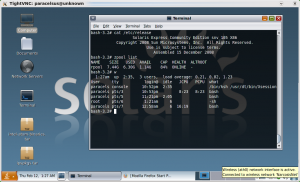
After my previous post about installing Solaris Express Community Edition (SXCE) on my Aspire One, I decided to give the Indiana 2008.11 release a try. The community edition was working fine, but I wanted to play around with IPS which I had trouble making work on SXCE, and also I just wanted a Gnome base install and the opportunity to see how 2008.11 installed and worked on the Aspire One.
The install is of moderate difficulty (easy of course once you have done it.) There are a few speeds bumps you may hit however and so I wrote this how to. This takes you step by step through installing OpenSolaris and you will end up sporting Solaris on your Aspire One. Compiz, ZFS, TimeSlider, DTrace, and working wifi are all your’s to be had.
+5 Geek Bonus to any who complete this quest, so saddle up, burn that .iso and start your quest.
One particulary fun thing to do is try a remote install from another system by X Forwarding the GUI Installer. That was kind of fun. (Screenshot of this to come.)
When the 2009.06 release is out I may attempt to use the Solaris Distribution Creator and make an .iso of an Aspire One Image that is ready to roll and put it up on bit torrent.
I encourage you to test drive OpenSolaris, and hope you find the guide usefull. Please leave feedback on how it goes and I’ll try to help – if I can (I’m a Linux guy and still pretty new to Solaris). Also, do check out Dave Clack’s excellent blog. Dave has worked with the Sun engineers helping to bring us driver support for the Aspire One and helped me with with my SXCE issues.
I would also like to thank Aaron Houston (Sun: Menlo Park) for hooking me up with some OpenSolaris advocacy materials – including a great device driver guide, some metallic “Powered by OpenSolaris” stickers and other goodies – another post to come on that.
Cheers,
Pete
Solaris 10 On Acer Aspire One
by admin on Feb.11, 2009, under Linux, Netbooks

A large grin now occupies my countenance whenever I boot up my Aspire One. I just can’t help myself.
As the grub splash screen comes up with the Solaris branding, and then watching ZFS initialize and SMF start services, ending in a nice cobalt blue Solaris log in screen. I just can’t help but smile.
Running Solaris on my little netbook allows me to experiment with so many features I have been wanting to become more familiar with. ZFS, Dtrace and containers are all working fine. And the fun just goes on from there.

I downloaded an installed Solaris Express Community Edition B105 and installed it via a USB attached CD ROM. The install did take quite some time, and I had to play around with the install options to get the install size down to a reasonable level. By default it wants to install more than 8GB, just larger in fact than then size of the SSD. However, this can be thinned considerably by going through the components to install. I got it down to about 3GB.
One caveat – I actually had to plug in the NIC in order for the networking (wireless and wired) to be properly detected during set up. Otherwise no networking device drivers are installed. Of course you could always install them after via downloading the packages onto a USB key – but why really.
I found the hardware to be very well supported with just the basic B105 install. Wireless networking, sound and X Windows (either GDM and basic Gnome or CDE) work quite well.
There are additional drivers you can get for video, wireless and SD card readers from either this great blog here or from the HCL site page for the Aspire One (which is itself pretty cool to see). The blog link goes to a Sun employee blog which has many very informative posts on running Solaris on the Aspire One, you will definitely want to check it out. Instructions for installing the drivers are there as well.
Although you can install and run it with only the base 512MB the Aspire comes with, and it is usable, it is a bit slow – not terrible, but you do notice it. I upgraded to 1.5GB and it runs absolutely fine.
You can install either StarOffice off the CD, however I chose to simply download the OpenOffice 3 package for Solaris, and it installed with no issues.
I still wanted a Linux OS as well, and so installed EEEBuntu onto a 16GB SD card and added an entry to Grub to boot to it. This works extremely well, and I can dual boot to either OS just fine. (See this post for more details on how to set this up.)
I really enjoy running Solaris on my Aspire One. So much for the idea “Solaris is great for big enterprise applications, but it is way overkill for a desktop – too much overhead.”
I really applaud Sun for making Solaris available as an Open Source project and for the time the Sun engineers took in making it work on the Aspire One.
I am also going to try to install the 2008.11 OpenSolaris release on it and see how that goes and report back. It features a smoother install experience and my be better suited to those who down want the full adventure of the SXCE installer, which is a bit non intuitive unless you are already a bit familiar with the packages.
I’ve been learning more about Solaris of course and will post some hints from my experience soon. If you have ever wanted to play a bit with Solaris, I encourage you to give it a try on your Aspire One!

EEEBuntu on Aspire One SD Card Booting
by admin on Feb.10, 2009, under Linux, Netbooks
One draw back the Aspire One has is that BIOS lacks an option to boot directly to the SD slots. I was disappointed when I saw this, as other UMPCs such as the EEE PC allow this. I really think Acer should update the BIOS to allow this, but as yet it remains unsupported. There are however workarounds. I had been planning on trying to use grub to chain load an OS install on the SD drive as was doing some research on this.
I then came across this great article here about installing EEEBuntu on the Acer Aspire One, specifically installing it onto an SD card.
Gary Rennie did a great on on the original article describing step by step how to make the initrd and giving an excellent review of EEEBuntu, I definitely recommend looking at his post for the overall procedure.
I had not previously heard of EEEbuntu and it certainly looked interesting, however the article’s method had one major draw back: It directs you to first install EEEBuntu onto the internal 8GB drive, then using it build a new initrd to use which contains the drivers allowing booting to the SD card, then actually installing it again onto the SD card.
I wanted to keep my existing install (Linpus at the time, now Solaris) on the 8GB drive and thought installing the same OS onto both the internal drive and an SD card was superfluous. I am sure a lot of users would prefer not to have to erase their existing installs in order to install EEEBuntu as an intermediary step.
To work around this I downloaded the EEEBuntu .iso and then installed it as a virtual machine using Virtualbox from Sun Microsystems. (I did this on my desktop system, not the Aspire One.) This was the first time I had used Virtualbox and I was quite impressed with it, though please note you do have to compile the kernel module for it to work (see the install documentation). It was very easy to set up and in a few minutes I had a fully running EEEBuntu Virtual Machine.
O3Spaces – Open Office and MS Office Collaboration
by admin on Jan.30, 2009, under College Stuff, Linux
Recently at school an issue once again reared its head, and of course needed to be solved with Linux.
You see, my school – St. Petersburg College – uses softwares for on-line classes that is very limited. One of the most significant things it lacks is any ability for students to collaborate on projects. The most it offers is private discussion boards, but no ability to collaborate on papers, etc. This makes it extremely difficult for a team to work on a paper or outline together. The only ready options were to use FTP or Google docs. FTP is not realistic for lay users, too unwieldy, no version control and no file lock out method, etc. Google docs is okay, but I wanted my own solution and there are those whose opinions make them not wish to use Google docs – data mining, etc.
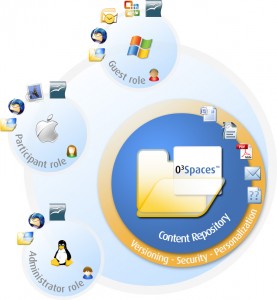
A quick look on Wikipedia found a good article comparing group ware and collaboration software and this lead in turn to O3Spaces. This is a pretty interesting application. While not open source there is a community edition available which allows up to 10 users to collaborate.
Of particular interest to me was the cross platform capabilities it offered. Users of both Open Office and Microsoft Office can download a desktop connector that allows them to edit documents and sync them with the O3Spaces server. As most classmates use Windows, while I use Linux and Solaris, this was perfect. (There is also a client for OS X as well, so you definitely have your bases covered here.)
Suse DNS Server – Wow, So Easy
by admin on Jan.10, 2009, under Linux
(What to do this yourself? Check out the wiki how to for the DNS Sever and PXE server for Suse.)
The other day I came home and was needing to SSH into Syd’s Mac G4 and also RDP into one of my notebooks. As usual, I had forgetten their IPs or they had changed.
“You know, wouldn’t it be just super geeky to run my own DNS server at home so I didn’t have this problem?” I asked.
I then proceeded to discover that setting up a DNS server in Suse 11 is simplicity itself. Yast makes the process incredibly simple.
I also really love how Suse allows you to use Yast in the CLI – that makes adding records and zone files extremely easy. You can just SSH in and make any changes in Yast, very nice.
It took all of about :20 to get my DNS server up and running. Of course then I had to play around with it. I also learned how to set up my dhcp server to supply a search domain when it gives out leases and also have dhcp statically assign IPs to hosts based on MAC addresses. It all works perfectly and hosts get their resolv.confs just how I want. As a bonus I have the Suse server act as a PXE server so if I need to diag a system at home I can PXE boot it to a linux environment for troubleshoointg, etc.
Now, being the lazy guy I am, I can now just reach all hosts in my house as easy as. . .
Callandor:/ # ping linux
PING linux.house.com (192.168.2.3) 56(84) bytes of data.
64 bytes from 192.168.2.3: icmp_seq=1 ttl=64 time=0.050 ms
— linux.house.com ping statistics —
1 packets transmitted, 1 received, 0% packet loss, time 0ms
rtt min/avg/max/mdev = 0.050/0.050/0.050/0.000 ms
Now that is what I like!

