Netbooks
Lint Mint 6 XFCE on OLPC
by admin on Jul.14, 2009, under IT Adventures, Linux, Netbooks
A while back when Linux Mint 6 XFCE (based on Ubunut Intrepid) was released and reviewed on The Linux Action Show I thought of what a good platform it could be for the OLPC. (The Linux Action show is a great pod cast by the way!) I had previously installed Ubuntu Hardy on the OLPC, but the extras the Linux Mint guys added to XFCE sounded pretty cool. Especially considering I am thinking of giving the OLPC away to someone who is a newer Linux user, having Mint as the OS was pretty appealing. And oh, my old Hardy install was utterly nuked on the SD card anyway – who knows. I might have tried to recover the partition tables with TestDisk, etc. but really – who cares. Time for a new OLPC adventure anyway!
In fact I had hardly touched my OLPC in nearly a year, since buying my Acer Aspire One – which I really love. And although the Aspire One is obviously far better performance wise, there are certain characteristics of the OLPC that I really like, such as:
Monochrome Screen Mode: This is absolutely awesome. The screen back light turns completely off saving big time power. Sunlight goes through the LCD and is reflected off a panel, making the screen extremely readable in direct sunlight. It is really fantastic and I wish ALL netbooks had this feature. It is hard to describe how legible it is, even in harsh direct light.
Battery Life: Especially when running in monochrome mode, battery life is quite good.
Mesh Networking: Interesting stuff – and oh, the wireless net supports injection. Hacking opportunities for kids the world round.
Case Design: Everything folds up to protect ports. Integrated carrying handle.
Open Firmware: Yea, it’s kind of different and fun to play with. Similar to the Open Firmware in the pre-Intel Macs, but far more fun than that was. Since we will be seeing a lot more systems using Open Firmware in the future it is good to play with it now. By by BIOS – you served us well.
Philosophy: Providing technology that would otherwise be unavailable to kids in remote places does not at all seem like a bad idea to me.
HAM Radio: I am thinking the OLPC, with the above features, seems a perfect candidate to use with packet radio. Communicate with friends after the coming apocalypse. Run it for years, and never worry about the back light burning out – you don’t need it.
(As a note: It was great seeing a few people recently at Toorcamp with their OLPCs – I saw two or three there, as well as two OLPC billboards on the trip to Seattle.)
Okay – enough extolling the OLPC virtues. How to install Linux Mint on it.
How to Install Linux Mint 6 XFCE on the OLPC
0) Pre-install Steps
0) First off, you do not need to go through exotic hoops to get this to work. Some guys have had success installing Mint onto an SD card first and then installing Hardy over the top of it and ended up with a working Mint install. Using the following method you can simply install Mint and it should work fine. (If you do want to install a vanilla Hardy, I would highly recommend using this method using compressed files instead.)
00) I suggest you update the OLPC firmware and Fedora base OS before installing Mint. Simply connecting to a wireless network and running #olpc-update as root will download all updates and update the firmware as well. (Have it pluged into AC or the firmware upgrade will be skipped.) BE PATIENT – the upgrade rsyncs several hundred megs over your wireless connection. It takes a very long time.
Getting Fedora LiveUSB-Creator to actually create something
by admin on Jul.10, 2009, under Linux, Netbooks
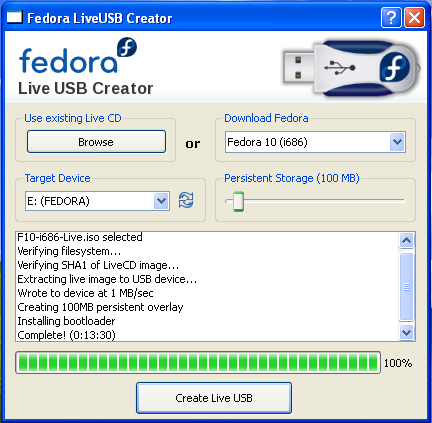
So a few weeks ago I found this nifty utility to create a Fedora persistent live USB stick and thought I would give it a go tonight.
It runs in a simple GUI interface and lets you select the amount of space to dedicate to persistence. You can also choose which version of Fedora to install and it will grab the needed .iso automatically – which is very nice. All in all, it looked pretty cool. And it apparently will work on the OLPC too, which is also nice.
The site describes it as:
“The liveusb-creator is a cross-platform tool for easily installing live operating systems on to USB flash drives. Works in Windows and Linux!”
Well, by “cross-platform” they apparently mean “this works if you are using Fedora already or Windows.” If you are using another Linux distro, you will encounter a few issues as it depends on some packages that are installed by default in Fedora and often are not available in other distro’s repositories.
Here is how I got this to work under Suse 11.1 The same general points may apply to other distros as well, and you will likely have to find the packages from your favorite sites – fortunately there are not many required.
How to make it work:
The README says to install python-qt4 so start with that if you don’t already have it.
Download, upzip and run liveusb-creator. Select your version of Fedora to install and the USB drive to install to. It will download the matching .iso to the working directory.
What follows are the various fixes I used for each new issue as it turned up. Note that you don’t have to download the .iso again on subsequent attempts, but you may rather browse to it – it puts .iso’s in the working directory the utility runs from.
Live From Toorcamp
by admin on Jul.03, 2009, under IT Adventures, Linux, My Life, Netbooks, Sago Labs
[Want to see the pictures? They are here!]
Kyle and I arrived to Seattle late Wednesday and my brother Robert picked us up. After staying the night at his place we got up Thursday morning and road tripped across the cascades toward Moses Lake. The trip through the mountains was very nice, with beautiful scenery. I’ve not been in the cascades in over 20 years, and it was a plesent change of scenery from my current Tampa bay scenery.
We navigated easily to the site, about :35 outside of town. The environment is farmland, with crops (hey and alfalfa it seems) stretching into the horizons. It is semi-arid and pretty hot, in the low 90’s, and extremely dusty.
First thing on arrival: Assemble and solder your camp pass – a few resisters and two LEDs on a PCB with an inducer – then test by swipping in front of a credit card reader. Blink blink, you are a go.
Presentations yesterday and the Ignite! Toorcamp talks last night were very good – ranging from OSX & Linux stack protection and memory randomization in compiled apps, a Spacepunk talk showing low earth photos taken with a home constructed satellite made with a Sony cybershot camera and deployed via balloon by Hackerbot Labs – they are on site and I’ll be seeing them for more info on this! Also a very interesting talk by Psychesonics on binomial sound waves to sync brain wave activity – hack your mind.
We went to town this morning for supplies, returning for the first talks. I’m sitting in an iptables firewall class now, to be followed by muti-channel bluetooth hacking and then SQL injection.
Bad news: Apparently camp coordinators did not have a contract with explicit access rights to the Missile Silo itself, leaving all authority up to the discretion of the owner. This is bad. As a result, before the conference even started some guys went into the silo unauthorised, the owner paniced and decided to revoke ALL access to the Silo yesterday – so all the talks yesterday that were to be given underground were given on the surface instead. Now, the owner has so graciously allowed one group of people so far to tour the underground silo. It is unknown yet if there will be more tours offered.
Moral of the story: When hosting an event at speciality locations, get a contract to ensure your access rights, etc. Otherwise – just use the national forest which costs nothing and has full public access rights. And it’s a hell of a lot more comfortable environmentally in the mountians!
But the conference itself, the data and the attendees are all very interesting and entertaining and there is a lot more goodness yet to come.
Will update more later.
OpenSolaris 2008.11 Acer Aspire One Install
by admin on Mar.09, 2009, under IT Adventures, Netbooks
After my previous post about installing Solaris Express Community Edition (SXCE) on my Aspire One, I decided to give the Indiana 2008.11 release a try. The community edition was working fine, but I wanted to play around with IPS which I had trouble making work on SXCE, and also I just wanted a Gnome base install and the opportunity to see how 2008.11 installed and worked on the Aspire One.
The install is of moderate difficulty (easy of course once you have done it.) There are a few speeds bumps you may hit however and so I wrote this how to. This takes you step by step through installing OpenSolaris and you will end up sporting Solaris on your Aspire One. Compiz, ZFS, TimeSlider, DTrace, and working wifi are all your’s to be had.
+5 Geek Bonus to any who complete this quest, so saddle up, burn that .iso and start your quest.
One particulary fun thing to do is try a remote install from another system by X Forwarding the GUI Installer. That was kind of fun. (Screenshot of this to come.)
When the 2009.06 release is out I may attempt to use the Solaris Distribution Creator and make an .iso of an Aspire One Image that is ready to roll and put it up on bit torrent.
I encourage you to test drive OpenSolaris, and hope you find the guide usefull. Please leave feedback on how it goes and I’ll try to help – if I can (I’m a Linux guy and still pretty new to Solaris). Also, do check out Dave Clack’s excellent blog. Dave has worked with the Sun engineers helping to bring us driver support for the Aspire One and helped me with with my SXCE issues.
I would also like to thank Aaron Houston (Sun: Menlo Park) for hooking me up with some OpenSolaris advocacy materials – including a great device driver guide, some metallic “Powered by OpenSolaris” stickers and other goodies – another post to come on that.
Cheers,
Pete
Solaris 10 On Acer Aspire One
by admin on Feb.11, 2009, under Linux, Netbooks

A large grin now occupies my countenance whenever I boot up my Aspire One. I just can’t help myself.
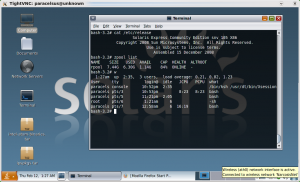
As the grub splash screen comes up with the Solaris branding, and then watching ZFS initialize and SMF start services, ending in a nice cobalt blue Solaris log in screen. I just can’t help but smile.
Running Solaris on my little netbook allows me to experiment with so many features I have been wanting to become more familiar with. ZFS, Dtrace and containers are all working fine. And the fun just goes on from there.

I downloaded an installed Solaris Express Community Edition B105 and installed it via a USB attached CD ROM. The install did take quite some time, and I had to play around with the install options to get the install size down to a reasonable level. By default it wants to install more than 8GB, just larger in fact than then size of the SSD. However, this can be thinned considerably by going through the components to install. I got it down to about 3GB.
One caveat – I actually had to plug in the NIC in order for the networking (wireless and wired) to be properly detected during set up. Otherwise no networking device drivers are installed. Of course you could always install them after via downloading the packages onto a USB key – but why really.
I found the hardware to be very well supported with just the basic B105 install. Wireless networking, sound and X Windows (either GDM and basic Gnome or CDE) work quite well.
There are additional drivers you can get for video, wireless and SD card readers from either this great blog here or from the HCL site page for the Aspire One (which is itself pretty cool to see). The blog link goes to a Sun employee blog which has many very informative posts on running Solaris on the Aspire One, you will definitely want to check it out. Instructions for installing the drivers are there as well.
Although you can install and run it with only the base 512MB the Aspire comes with, and it is usable, it is a bit slow – not terrible, but you do notice it. I upgraded to 1.5GB and it runs absolutely fine.
You can install either StarOffice off the CD, however I chose to simply download the OpenOffice 3 package for Solaris, and it installed with no issues.
I still wanted a Linux OS as well, and so installed EEEBuntu onto a 16GB SD card and added an entry to Grub to boot to it. This works extremely well, and I can dual boot to either OS just fine. (See this post for more details on how to set this up.)
I really enjoy running Solaris on my Aspire One. So much for the idea “Solaris is great for big enterprise applications, but it is way overkill for a desktop – too much overhead.”
I really applaud Sun for making Solaris available as an Open Source project and for the time the Sun engineers took in making it work on the Aspire One.
I am also going to try to install the 2008.11 OpenSolaris release on it and see how that goes and report back. It features a smoother install experience and my be better suited to those who down want the full adventure of the SXCE installer, which is a bit non intuitive unless you are already a bit familiar with the packages.
I’ve been learning more about Solaris of course and will post some hints from my experience soon. If you have ever wanted to play a bit with Solaris, I encourage you to give it a try on your Aspire One!


